

Growing Blueberries
Did you know blueberries prefer acidic soil? This is our guide to growing blueberries in the Maritimes
Site and Soil
Blueberries require full sun and a well-drained soil. They prefer a gravelly or sandy soil and will not thrive in heavy soils, particularly if they are damp. Their roots are very fine and cannot penetrate clays easily. Damp soils are one of the primary reasons for failure with blueberries, so although watering is important after transplanting, soggy ground is the kiss of death for blueberries.
Be sure that you add organic matter such as leaf mold or dampened peat moss to the soil if your land is lacking. Mix any organic matter well into the soil, particularly if you use peat moss. Never use more than 25% organic matter in the soil. A common cause of death is planting in a hole filled with materials such as peat moss. This will draw water away from the roots and, when wet, will stay soggy. Mixing well is the key.
Blueberries need an acidic soil to thrive. If you do not know the acidity level (pH) of your soil, have it tested at your Dept. of Agriculture or purchase a pH kit to test yourself. A pH of 4.5-5.5 is ideal for blueberries. In high pH soils the leaves will yellow, a condition known as chlorosis. In such situations use a source of iron such as iron chelate. Follow the directions and water it with the solution. It does not take much, but the difference it makes is often dramatic. Do not use aluminum sulfate as this material can be toxic to plants. If your soil’s pH is over 5.5 you can add a small amount of wettable sulfur to the surface.
Planting
Blueberries are shallow rooted plants. When planting, place the root ball at the same depth as in the pot. If you have a bare rooted plant, place the roots just barely under the surface. Be sure to water well after transplanting and water with approximately 2-3cm (1 in.) of water per week if it does not rain. Do not keep the ground soggy.
It is advisable to use a 3cm layer of mulch such as decomposed bark, pine needles or sawdust on the surface. Remember that fresh materials like sawdust or new bark will use available nitrogen as they break down. If you must use fresh materials, add a dusting of blood meal to the surface before mulching. This will provide a source of nitrogen. Bone meal and compost are not advised as these raise the pH of the soil.
After Care
Blueberries need little pruning in their early years. Later you can remove crossed limbs or older stems to let new canes rejuvenate the bush. Each year a dusting of blood meal, cottonseed meal or linseed meal will provide adequate nutrients. Keep competing weeds away with annual mulching. Be sure not to cultivate deeply or the shallow roots will be damaged.
Growing Clematis
Is there a secret to growing Clematis? We don’t think so, but here is a guide with our best tips
Clematis prefer a loam soil rich in organics, which is well-drained yet moist. When planting, choose a site which will receive adequate moisture at all times, as clematis use large amounts of water. Avoid planting clematis under the roof eaves of buildings. This area is generally too dry. Dry sites are probably the number one cause of transplanting failure. If you want to train your clematis against a wall, plant it beyond the dripline of the eave and train it in to your trellis.
Dig the planting hole 20 cm (8 in.) deep and 30-40 cm (1 ft +) wide. Fill the hole with rich soil, hopefully with good compost worked in. Add a handful of bonemeal, as this is rich in phosphorous, which aids in early root development and a handful of blood meal for a slow release form of nitrogen for top growth. The crown of the plant should be placed several inches below the surface of the soil. These buried stems will produce their own roots and if the stem is broken or attacked by clematis wilt the buried buds will send up healthy replacement stems. Clematis prefer a sweet soil (pH 6-6.5 is ideal). Have your soil tested or purchase a pH kit. If the soil is acidic add agricultural lime to the soil. A rule of thumb is to make the ground white with no actual thickness. Repeat every 6 years.
Mulch with shredded bark or other suitable material. Water the plant in well. A water soluble fertilizer or manure tea can be used at this time. If you use a granular fertilizer be sure it is not overly high in nitrogen and apply sparingly on the soil surface only. Keep your plant well watered, but not soggy, until it is established. Keep your plant weeded and maintain a light mulch covering so that the roots stay cool and moist. Clematis generally prefer a sunny location although some shade is tolerated and some varieties will have more intense color in partial shade.
Clematis grow by twining tendrils around whatever they meet. They can be grown against walls or up poles if some means of support is given such as a trellis or wires. Clematis can be used to good effect by planting so that they can grow up trees or against shrubbery. As well, they can be trained as groundcovers by using a frame of wood or wire to keep them slightly above the soil surface.
Clematis are a varied group and slightly different pruning methods are used according to the variety. For ease of understanding we have divided the varieties into 2 main groups.
Jackmannii and Viticella Group:
This group flowers during the summer on new wood only. These should be pruned 30 cm (1 ft.) from the ground in very early spring. This group includes varieties such as Bee's Jubilee, Comtesse de Bouchard, Ernest Markham, Gipsy Queen, Huldine, Jackmanii, Lady Betty Balfour and Ville de Lyon.
Patens, Languinosa and Florida Group:
This group produces larger flowers on the last year's wood in late spring, then smaller blossoms on the new wood during the summer. Prune back dead wood until green is encountered in the stem. Leave all live wood. If some thinning is necessary on older plants, prune immediately after the early blooms are done. Varieties include Duchess of Edinburgh, Elsa Spaeth (Xerxes), Henryi, Miss Bateman, Ramona (hybrida sieboldii), Silver Moon, and William Kennett.
As to how you say "clematis" - Clem' a tis or cle ma' tis -- it's up to you. Both pronunciations are accepted by the dictionary.
Growing Daylilies
We have an impressive collection of Daylily varieties; here’s a guide to help you grow your own
Daylilies are some of the most rewarding perennials you can grow. As the name infers, each blossom only lasts a day, but daylilies bloom for many weeks and many of the modern hybrids have very long blooming periods, often several months. Early varieties start in June. Most varieties begin blooming in mid-late July and continue into fall. The daylily is now available in virtually every color but blue, and forms vary from traditional narrow petals to wide, ruffled blossoms.
Daylilies are often listed as dormant, semi-evergreen or evergreen. This refers to how quickly the foliage dies down in winter. Dormant daylilies die down to the ground early and are usually considered the hardiest varieties. Semi-evergreen types usually leave some green, and evergreen types remain green in warmer climates.
In our severe winters even semi-evergreen and evergreen types will kill down to the ground unless covered early by snow. We grow many semi-evergreen types and have not had problems overwintering them. Although we do not grow or recommend growing evergreen types in the maritimes, you may be able to grow them with a good mulch cover.
Daylilies are adaptable to many soil types, however they will thrive best when grown in a loose, loamy soil with good drainage. Adjust your soil's pH, (acidity level), to 6-7. In most maritime soils you will need to add some ground limestone to reach this pH level.
In fall, or early spring, work in compost or well rotted manure. We also add a handful of fish meal, lobster meal or blood-bone meal to provide lots of nitrogen and phosphorus. Although daylilies will survive droughty conditions, you should be sure they are adequately watered if you want the best blooms.
Daylilies can be divided in early spring or fall with relative ease. Dig the clump up and divide with a knife, or your hands if the clump is relatively young. Older, tighter clumps may require a shovel or axe to accomplish division. Water in the divisions well and mulch especially in fall.
Many of the modern hybrids have unusual patterns on the petals. Some of the characteristics you will find include:
Eyezones - a different colored patch in the throat of the flower
Watermarks - a colored area extending from the throat outward onto the petal
Crimping - light or heavy ruffling of the petal edges
Wiring - a thin line of color that runs along the petal edge
Diamond dusting - a reflective petal surface that sparkles
Many newer daylilies have wider petals than the traditional petal form, often creating a completely rounded flower form. The spiders have the opposite in that they have very narrow petals that often twist, creating a spidery effect.
Growing Grapes
Tips and systems for growing and pruning grapes
Planting
Your plant may be either potted or bare root. If potted, remove from the pot. If there are twining roots tease them out so you can spread them evenly in the hole. Use the soil that you removed from the hole mixed with a handful or two of compost and a single handful of bloodmeal and bonemeal, or fish meal or alfalfa meal. Grapes grow best in a sweet soil (pH 6-7). Have your soil tested or buy a testing kit. If the soil is acidic (lower number) add agricultural lime. Grapes have wide spreading root systems so spread the lime a good distance from the trunk. A rule of thumb is to make the ground white with no actual thickness. Repeat every 6 years. Keep your plant well watered the first year but never soggy. A surface mulch will help keep the soil moist and retard weeds.
Pruning
Grapes naturally grow into trees and shrubs in order to reach the sun. Their purpose is to produce seed. Over the centuries people have chosen particular seedlings of several grape species that produce grapes that are larger, sweeter or that have superior properties for making wine.
In order to increase the size and sugar content of grapes vigorous pruning of the plants is practiced. Often a good portion of the plant is removed each year.
In order to prevent sap bleed we find fall is the best time to prune. November is ideal as the wood has hardened off and become dormant. Also, the leaves are gone, making the decision of where to prune easier. Spring pruning can be done as well, but the plants will bleed sap for several weeks, which can attract insects and fungi.
Growing Systems
Many types of systems for training and pruning grapes have developed over time. Most systems involve the use of posts and wires to expose the vines to the most sun and to secure the vines.
Though the systems may vary, the principle of pruning is to renew the plant each year by removing the canes that bore fruit the previous season and to use some of the new canes that have recently grown to provide fruit for the coming year.
When the old canes are removed a portion at the base of the cane, having one or two buds, is left to provide new canes for the following year. These remainders are referred to as renewal spurs.
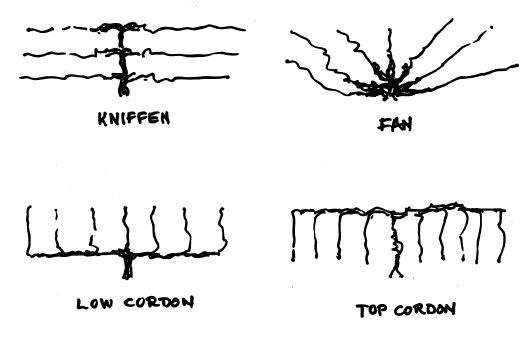
Below are diagrams of some of the most popular forms of training systems. The growth habit of the particular grape (the cultivar) often influences the choice of system. For example the low cordon system is better suited to upright growing cultivars, whereas more prostrate cultivars are better suited to a high cordon system.
Growing Kiwi
Kiwi lover? A guide for growing hardy kiwi in the Maritimes
There are two species of hardy kiwis. Actinidia arguta (called hardy kiwi) has shiny leaves, slightly larger fruit and is a blocky shaped fruit. Actinitia kolomikta (called arctic kiwi) is slightly smaller and shaped more like a grape. It has matte green leaves and during flowering the leaves, particularly of the males, will have white and pink variegation. The kolomiktas are slightly hardier than the argutas, although both will do well in hardiness zone 4.
Both hardy Kiwis have a flavour similar to the brown, fuzzy types found in the stores but are somewhat sweeter, hairless and the size of a large grape. They grow on a vigorous vine and can be trained on a trellis or on posts and wire. You must have a male for pollination. You can have up to 9 females for each male. Plant the male close to the females and keep it upwind to maximize pollination. (Choose male plants to pollinate females of the same species.
Argutas begin producing in 6 years, Kolomiktas in 2 years. Kiwis need a rich and well-drained soil to prosper. Kiwis will not do well in sites that receive later spring frosts as the leaves are frost tender. It is important to provide adequate water after transplanting and during drought periods. Keep roots cool and moist. An interesting side note is that cats love to rub against newly planted kiwis, so be sure to protect them from cats until they grow a tough vine.
Growing Peaches
The peach trees you receive were dug in the fall and stored over winter with their roots in moist sawdust. On arrival check the plant. If there are any broken branches or roots prune these off. Place the roots in water for a period of not more than 2 hours.
Choose a site that receives full sun or nearly so. Protection from north and west winter winds is essential, particularly in colder areas. The site you plant your trees in should be well drained. Wet soil will cause the roots to rot. If water comes into the hole when you dig the hole, do not use that site. Dig a hole so that the crown of the plant (where the roots meet the stem) is at ground level. Do not plant too deeply or the stem may eventually rot. The depth of the hole should be just deep enough for the roots. It is far more important to create a wide hole, as most roots will grow horizontally.
Using the same soil that was in the hole, mix in a small handful of bonemeal and a handful of a high nitrogen supplement such as blood meal, fish meal, feather meal or alfalfa meal. Hopefully you can test your soil to determine its pH or acidity level. Peaches prefer a pH of 6-7, so soils that are below this level should receive a heavy dusting of agricultural lime in the area where the tree’s roots will eventually grow. |Repeat this process every six years. A shovelful of good quality compost should be incorporated as well. Mix this well and distribute it evenly around the roots, making sure there are no air pockets. Once the hole is filled, soak the soil thoroughly to ensure good contact between the roots and soil. Many people create a small ‘crater’ to keep the water centered on the root system. Give the plant the equivalent of an inch of rain at least once a week, but do not allow the soil to become soggy. Soil should be moist but never saturated.
For the first year provide a stake close to the trunk to prevent wind from rocking the plant. Use a flexible tie that will not harm the bark. After one year remove the stake.
For the first year, prune only diseased or damaged wood. As the tree grows you can remove one or two branches each year if necessary to create a balanced structure with branches around 8inches (30cm) apart. The more you prune, the more you will delay fruit production. As always, the answer lies in balance.
Peaches are a risky crop in Hardiness Zones 4 and 5, but if you provide protection, have a hardy variety and keep your plant well-watered and fed, you will have a good chance of picking and tasting one of nature’s finest fruits.
Growing Raspberries
Growing raspberries in the Maritimes
Raspberries will grow in a variety of soil conditions but prefer a well-drained moist and reasonably light soil. We recommend planting approximately 18 in. apart. Rows should be approximately 4 ft. apart. Feed with compost or rotted manure in the late fall or early spring. Mulching with shredded bark or sawdust is advantageous but be sure nitrogen levels are kept high enough for good growth.
Raspberries grow best in slightly acid soils (pH of 5.6-6.2). Plants produce berries on 2 yr canes. After bearing, these older canes should be cut out and 1 yr canes should be thinned out enough that each will receive adequate light, water and nutrients. We believe the varieties we carry are the best suited to growing conditions in the Maritimes provinces and similar colder areas of the country. All our canes are from virus tested stock.
Growing Roses
Our best tips for growing and pruning roses
The roses we produce are grown from cuttings and are on their own roots. You do not have to concern yourself about the placement of the bud union as you do in budded roses. Plant them in the same manner as any other shrub. Any suckers which appear from the base of your rose in the future will be the same variety you purchased.
You should plant in a site that receives at least one-half day of full sun, and more is better. The soil should drain well and have adequate organic matter. If your soil is low in organic matter be sure to add compost to the soil. When planting mix the compost thoroughly with the existing soil. Roses grow best in a neutral soil. It is advised to have your soil tested, or to purchase a kit that will show you the pH (acidity level) of your soil. If the test shows results below 6, you should add agricultural limestone to raise the level to between 6 and 7. In more acidic soils many of the nutrients such as calcium and magnesium are chemically bound up. Raising the pH will release many of these.
We recommend pruning your new rose back approximately one-third to encourage vigorous shoots. It is not necessary to prune them drastically, as you do many packaged roses. In fact many prefer not to prune our roses at all when planting. Some roses are briar-like plants and will sucker and spread if given cultivated ground.
Young roses should require only the removal of winter-damaged canes in spring. Generally shrub roses are pruned more sparingly than hybrid teas or floribundas. As your plant ages, we recommend pruning out the oldest canes and allowing new suckers to take their place.
If you want to cut back an older shrub rose do it in early spring before the buds expand. Rose hedges should also be pruned at this time. Be sure to keep the base of your hedge wider than the top to allow light to reach the bottom stems.
Although winter protection is generally not necessary with these hardy roses, if you are trying to grow a variety that is tender in your area you can protect it in winter with either an overwintering blanket or by mounding the base with a mulch such as bark chips.
Remember that good flower production demands adequate moisture at all times, good drainage, good fertility and high light levels. If these conditions are met, and weeds kept under control, you should enjoy many beautiful blooms.