

Ball and Burlap Planting Instructions
At our nursery we sell large plant material, such as evergreens and deciduous trees, that don’t fit in our traditional nursery pots. Because they are so large, we use a tree spade and corresponding machinery that carves around the root ball and pulls the tree out of the ground. The machine will place the tree and its root ball into a wire basket with burlap inside. The root ball is then cleaned up from grass and weeds, and the burlap is tied around the soil to protect the roots. The basket is tied using nursery twine to secure it and the trees are moved to either stock blocks or the store to be sold.
Purchasing a tree of this size generally means you will require equipment to move and plant it. Something with forks will generally work, a small tractor, or front end loader. Please keep this in mind, and have a designated landscape team or crew to help you if you do not have the equipment.
Instructions for Planting Ball and Burlap Trees
Our baskets are 30 inches across. The width of your hole should be at least 12 inches wider on all sides for appropriate planting. The depth of the hole should be dug only AS deep as the ball is tall, approximately 19 inches.
Once your hole is dug, you’re ready to place the basket and adjust it to your desired position.
Remove the ropes at the top of the root ball, and untie the burlap from around the base of the tree.
Carefully cut the wires to the depth you can reach and remove the excess.
Fold back the burlap, or cut it off where it meets the remaining basket.
Backfill around the ball in layers, tamping firmly as you go. Create a “crater” on the surface and fill with water. Repeat this several times to make sure the entire root ball is damp. Keep well-watered until freeze-up.
Note: Deciduous trees should be supported using three metal stakes driven into unmoved ground, and attached with tree tie. If you have wire and an old garden hose laying around, they can be used together to create ties for the tree as the hose will protect the trunk from wire cutting into it.
Conifers are usually supported with three ground stakes and wires to the trunk with protectors. For safety, place flagging tape on the wires for visibility.
False Balls
A false balled tree is similar to the above mentioned material, but instead of being dug from the ground with the root ball intact, these trees have been dug in a way that the soil could be shaken off. A false ball is essentially a bare root plant that has been freshly potted into a basket with a burlap liner.
Instructions for Planting False Balls
The instructions to plant false balls are nearly identical to those for planting a root ball. The difference is in step number 4.
Our baskets are 30 inches across. The width of your hole should be at least 12 inches wider on all sides for appropriate planting. The depth of the hole should be dug only AS deep as the ball is tall, approximately 19 inches.
Once your hole is dug, you’re ready to place the basket and adjust it to your desired position.
Remove the ropes at the top of the root ball, and untie the burlap from around the base of the tree.
Carefully cut the top wires to the first horizontal wire, leaving the basket itself in place.
Fold back the burlap, or cut it off where it meets the remaining basket.
Backfill around the ball in layers, tamping firmly as you go. Create a “crater” on the surface and fill with water. Repeat this several times to make sure the entire root ball is damp. Keep well-watered until freeze-up.
The same notes apply for staking and supporting the trees.
Creating a Successful Apple Orchard
There is a great difference between planting an orchard that survives and one that thrives. To create an orchard that grows well and produces quality apples, there are several considerations that should be addressed before any apple trees are planted.
SITE
The site chosen for an orchard can mean the difference between having a crop, or no crop. The most important factor is the occurrence of frosts during flowering. In a low-lying site, cold air will pool during still nights and frosts are likely to occur. A site on a hill where air is draining down toward a lower area, or a site near a large body of water that moderates the temperature, will be far less likely to experience frosts during this critical period. While most of us have little choice in placing an orchard, siting in the most advantageous position will play an important role in its success.
SOIL
Soil is the basis of all life, but soils differ tremendously in their ability to provide nutrients to an apple tree. To provide the needs of the apple tree, a soil should contain the elements required to create healthy foliage and fruit.
Soils are composed of three basic ingredients - sand, clay, and silt. Soils that are sand based may be lacking in some of these elements, as sand is essentially silica, and will only break down over time periods that are beyond our reckoning. In such soils the nutrients needed must be provided by organic matter, which is the remains of plants and animals. If the soil has little other than silica sand and stone, the task of providing enough organic matter may be difficult to near impossible.
Clay soils have both advantages and disadvantages. Clays usually contain a host of elements and are far more productive than sandy soils, but if the percentage of clay to sand and/or silt is too high there can be problems with drainage, and the denser texture may not allow easy access by the roots.
Soils with a high silt content are far less common, however such soils are usually very productive.
The ideal soil is a blend of sand, clay, and silt. Such soils can provide a wealth of nutrients and will have good drainage. Good drainage is essential for a successful apple orchard. In poorly drained soils the roots may be subject to long periods when the soil around them is saturated. The lack of oxygen will inevitably suffocate the roots. It can also create a condition where the roots of the tree can only exist near the surface. Shallow roots will not be able to properly support the tree during high winds, especially if there is a large crop.
If the soil does not drain well, drainage can be provided by installing perforated drainpipes that carry away excess water. These should be located below the root zone. You can also form the land so the rows of trees are on built up berms separated by lower swales that carry the water away. It is obvious that such measures add a great deal to the cost of an orchard, and may still not create the ideal conditions the trees need.
The best orchard soils are well drained sandy or clay loams with high organic matter content. The organic matter is vital to growth, as its gradual breakdown releases the nutrients it contains, and its spongy texture helps hold both air and water.
While less than ideal soils can be adjusted, such measures will add considerably to the cost of establishment.
SOIL pH
Another soil related issue is its acidity level. This level is measured using the pH (potential hydrogen) scale. The scale runs from 0 (think hydrochloric acid) to 14 (think lye). In this system 7 is neutral, neither acidic nor alkaline. Apples grow best in soils with a pH of 6.5-7.0. In more acidic soils, many nutrients such as calcium and magnesium are chemically bound up in molecules that cannot be accessed by the roots. If ground limestone is added according to need, the pH can be raised over a period of years to the desired level and maintained by the addition of lime every six years or so. As the pH nears neutral, the elements are released from their bonds and become free floating ions that are easily absorbed by the roots. Although not as common, if the soil is alkaline, sulfur can be added to lower the pH toward neutral. For young trees to grow to their potential, an orchard should not be planted until the pH is at the proper level.
SPACING
For the homeowner, placing a few trees in a yard is not a big issue, however if you are contemplating a larger orchard the spacing of trees becomes very important. Most commercial orchards are now planted in rows with trees placed around 1m (3ft) apart. These trees are grafted on dwarfing roots and will require permanent posts and wires to support them over the life of the orchard. If you choose a more traditionally spaced orchard, be sure to choose rootstocks that will provide good anchorage. Even if the trees will not be supported long term, be sure to stake the new trees for one year. This will prevent rocking of the trees in wind, which slows establishment, and will keep them straighter in the row and better balanced to hold a crop.
ROOTSTOCKS
An apple tree is both the cultivar (what most people call a variety) you want to harvest and the rootstock the top is grafted onto. The rootstock you use should be carefully chosen. Seedling rootstocks will vary in size, productivity, and the speed at which the cultivar comes into bearing. The advantage of seedlings lies is in their diversity. In a difficult winter, chances are not all trees will be affected. If you are growing on one type of clonal rootstock, then a possibility exists that all will be affected. The advantages of a clonal rootstock are that its size, productivity, and precocity (speed at which it comes into bearing) are known factors. There is more uniformity in the trees. There are now many clonal rootstocks available, and a bit of research will be invaluable to the future of your endeavor.
CULTIVARS (VARIETIES)
Just as important as the rootstocks are the cultivars you choose to grow. There are early, mid-season, and late cultivars. Generally speaking, the earlier apples do not keep as well and are most often used for cooking (sauces, baking, etc.). The later apples tend to be firmer and keep better. For a family’s use, one or two early apple cultivars will be enough once they are in full fruit. Usually, the bulk of the trees in an orchard will be later ripening.
There are hundreds of available apples. Choosing which to use is a question of taste, usage, hardiness, and disease resistance. These latter characteristics are of ultimate importance. You should choose apples that will survive your winters. Those that are injured by low temperatures will be prone to disease such as cankers and may even be killed. Disease resistant cultivars will make your life far easier. Luckily, there are now many disease-resistant apples available. Though you will still have insects to consider, the lack of fungal diseases such as apple scab, mildew, and cedar apple rust will decrease the burden of protection considerably.
INSECTS
There is no greater challenge in horticulture than producing high quality, clean apples using organic methods. Everything wants to eat the apple. The list of insects, birds and mammals that can create challenges for the grower are long. Dealing with this assemblage of pests is what will occupy you for the life of the orchard. However, this is an exciting and rewarding time to grow apples without the use of toxic chemicals. Here is a partial list of pests along with products and methods that can be used against them.
Apple maggot- The maggot flies rise from their wintering places in the soil in early to mid-summer (early July in N.B.) Use yellow plastic balls covered with a sticky substance such as Tanglefoot or sticky cards to lure the flies. These act as monitors. Once the first flies are caught it is time to protect the crop. The most effective product on the market today is Naturalyte (GF 120 commercially). This contains Spinosad, which is produced by soil microbes. It is non-toxic to mammals. Using a backpack sprayer with the spinner removed, you whip the wand a few times to put droplets on the underside of the leaves. You need only do this to every second or third tree in the row. The flies are attracted to these feeding stations and die after feeding on the droplets. Reapply after heavy rains or every week or so until near harvest. If well applied, you will have little or no maggot damage.
European sawfly-This insect emerges just before flowering and will feed on the flowers and the newly forming fruit. Their presence can be seen later as a spiral scar that emanates from the basin end of the apple. Later instars (stages of growth) will bore into the side of the fruit, rendering it useless. Entrust is another product containing Spinosad. It should be applied to the trees just before flowering or just after. Do not use during flowering, as it is toxic to bees.
Codling moth-The codling moth emerges after flowering, but its damage is seen later than the sawfly. It usually bores into the side of the apple and eats its way to the core. Larger orchards can use mating disruptors such as Isomate C-Plus, that are hung in the top of the tree. Over the season they release a synthetic pheromone that fills the air, thus confusing the male looking for a mate. Small orchards can place cardboard bands on the trunks in the late summer. The larvae will try to overwinter in these and can be destroyed.
Leafrollers-There are several leafrollers that feed on new growth and the developing apples. They roll up the tips of stems and will stunt growth and feed on the newly forming fruit, leaving scars. Just before flowering apply Btk (Bacillus thuringensis ‘Kurstaki’). This is a bacterium that only affects the larval stages of butterflies and moths. Once ingested, the insect stops feeding and dies. You may need to reapply in mid-summer. Monitor the foliage for any new damage to time the second spray.
FUNGI
The other major pests of apples are types of fungi that grow on the surface of the foliage and fruit. These arrive on the air emanating from the last year’s leaves and fallen fruit and from other trees in the area. Here are a few of the most important.
Apple scab-Scab forms lesions on the foliage and fruit that are brown to black in colour. Although the apples remain edible, they severely affect the appearance and make breakdown in storage more likely. Although dependent on temperature and humidity, generally the spores are released just prior to flowering. For organic growers a product called flowable sulfur can be used to prevent infection. Later, particularly after rainfalls, other sprays are advisable. The easiest way to avoid scab is to choose cultivars resistant to it. There are now many scab-resistant apples on the market.
Powdery mildew-Mildew overwinters in the buds and creates thread-like structures called mycelia that release spores as the flowers begin to open. They can severely affect growth and will affect the surface of the fruit. It does best when humidity is high, but does not flourish in rain, as the spores are washed away. Strangely enough, a spray of milk mixed at a ratio of one part milk to two parts water has been shown to be as effective as the fungicides used in the past. Reapply in early summer until the higher temperatures of summer arrive. Disease resistant cultivars are highly recommended, making prevention unnecessary.
Flyspeck and Sooty Blotch-These closely related diseases become noticeable on fruit at the end of the ripening season. They appear as tiny black dots or, as the name indicates, as sooty looking patches. They are most prevalent on fruit that is in the center of the tree where there is less air circulation. Although it does not affect the edibility of the fruit, it does affect the appearance. A spray of flowable sulfur in mid-season should prevent this fungus from developing.
European Canker-Canker most often develops where there has been winter injury, and most often in the crotches of trees. Using hardy cultivars is the best method of preventing its appearance. It will appear as sunken bark that appears black. If not dealt with, it can spread further and even pose a threat to the tree’s life. Once noticed, remove all affected tissue. Using a sharp knife, cut back the edges of the wound until a green edge (the cambium) is created. Paint the entire area with a latex paint.
BACTERIA
Fireblight-Monitoring the orchard for fireblight is essential, as once established in the orchard it can quickly spread to other trees. It infects the blossoms and/or the soft, growing tips of stems. The symptoms are blackened leaves and stem ends that often form a shepherd’s crook form. Remove the damage well below the infection site and destroy. Pruning shears should be dipped in alcohol after every cut to ensure transfer does not occur. Northern orchards are less prone to this disease, but warming trends are leading to more infections than in the past. Vigilance is required.
THE SATISFYING PART
If you have been attentive to the necessary activities listed above, you should be able to enjoy the best part of growing-the harvest. There is nothing more enjoyable than picking ripe clean fruit from your trees, knowing they have been raised by life affirming methods.
Fertilizing Tips
Fertilization
The secret to sustainable healthy growth in plants is the creation of a vibrant, living soil with a diversity of soil life. The cycle of life and death in the soil provides nutrients in the form of salts from wastes excreted by the animals and from the decomposition of plants and animals. To create such soils, you need to provide organic matter and the vital elements used by the organisms that break down that organic matter.
Organic Matter
Organic material is like money in the bank. It is digested by bacteria and other soil life. This process releases the nutrients contained in the cells into the soil. The more woody the material, the more slowly this will occur. Materials such as sawdust and wood chips have high carbon content and will break down slowly unless extra nitrogen is added.
Nitrogen is no more important than other nutrients, but is the nutrient that is usually the least abundant in soil. Softer materials that are low in carbon such as grass clippings and green vegetation will break down very fast. Perhaps the most useful organic additive is compost.
Compost is usually made of organic waste mixed with a high nitrogen source such as fresh manure. If turned regularly to introduce oxygen and kept moist, the materials break down quickly and the compost will not smell. Once the process of decomposition slows, the compost is ready to use. This stable material contains virtually all the nutrients needed for growth.
The use of mulches on the surface such as rotted bark can provide organic matter. Layer new mulch every 1-2 years. Do not mix it deeply in the soil. This will cause a temporary depletion of nitrogen. Two to three inches (up to 10cm) of mulch is sufficient.
Soil pH (Soil Acidity Level)
The soil acidity is one of the most important factors influencing plant growth. The acidity level of soil is measured on a scale of 0 (most acidic) to 14 (most alkaline). Most garden plants grow best in the 6- 7 range (neutral). Most Maritime soils are acidic (pH 5.5-5.8 on average).
You can have your soil tested to find out its pH. As a rule of thumb, acidic soils can be adjusted by covering the surface with enough agricultural lime to make the surface white, but with no thickness. Give a light dusting every 4-5 years to keep the level, as rain will eventually dissolve the lime. There are plants such as rhododendron, azalea and blueberry that require an acidic soil. Do not lime the soil around these plants.
Nitrogen-The Key Element
Nitrogen, a key component of proteins, is in the air around us but plants cannot absorb it directly from the air. The addition of nitrogen fertilizers will act as a catalyst to stimulate soil life. Nitrogen salts found in commercial fertilizers can burn plants if used in high concentrations and usually only a small portion is used by the plants.
Most of it washes to the lower levels of the soil where it enters the water table and can negatively affect ponds and streams. We suggest using organic sources that are eaten by soil life and stay in the root zone area where they are recycled. Organic sources include blood meal, fish meal, linseed meal, alfalfa meal and soy meal. Feed the soil and you will feed your plant.
General Planting and Pruning Tips
Unsure where to begin with planting? We’ve got you covered
Care on arrival for mail order plants
When your plants arrive in the mail, open the package and check to make sure that the roots are still damp. If you are planting them immediately, place the roots in water for a few hours, but no more than 6 hours. If you cannot plant them immediately, be sure to keep the roots damp and cool. If planting will be delayed for several days, place the roots temporarily in soil, damp sawdust or a similar material until you can plant them. Do not allow the roots to dry out. Be especially careful when planting that they are not allowed to sit in the sun or wind.
Planting bare root material
Prepare the ground prior to planting by removing any sod or weeds in the area where the plant is to be set. Pay particular attention to the removal of perennial weeds such as quack grass and vetch.
Good preparation at this stage will save countless hours of weeding in the future. In sandy or gravelly soils, incorporate organic matter such as a good finished compost to increase the water holding capacity of the soil and to furnish nutrients. A small handful of bone meal and blood meal worked into the soil you are placing around the roots is an excellent addition as well.
In heavy clay soils it is better to plant the roots using the same soil and place the compost on the surface. Never put soluble fertilizer or fresh manure in contact with the roots. These can burn the tissues of the plant. Most plants grow best in a soil with an acidity level (ph) of 6.0-6.5. It is a good idea to have your soil tested to know your soil acidity. If you have an acidic soil (most northern soils are) incorporate lime in the soil. Without a test you cannot know how much lime to add but as a rule of thumb a cup of ground agricultural lime (not hydrated lime) worked into the soil around your new plant will be sufficient in most northern soils. There are exceptions that should be noted. Plants such as rhododendrons, azaleas, blueberries and many evergreens prefer a more acidic soil. With such plants avoid using lime.
When planting, spread the roots evenly in the hole and pack the soil carefully around the roots. Avoid creating air pockets. When you finish the plant should be at the same level it was growing at in the nursery. Be sure not to plant hardwood trees or evergreens with their bark below the soil surface or they may rot and die. It is wise to leave the soil slightly dished around the new plant so that the water will not run away from the plant. When you finish packing the soil around the roots, soak the plant with water until the soil is saturated. Do not be stingy with the water. Keep your new plant will watered the first season but avoid keeping the ground soggy. They need oxygen as well as water.
We recommend placing a layer of mulch such as damp rotted bark, rotted sawdust or leaf mold on the surface. A mulch will aid in keeping soil moisture levels high and will prevent the germination of many annual weed seeds. It will not prevent weed growth but will make the job of pulling them much easier. As it rots it also adds to the organic content of the soil.
Planting Potted Stock
When planting material that has been grown in containers, prepare the hole in a similar manner to that described above. Remove the container. Stubborn pots can often be removed by giving them a sharp hard rap on the bottom of the pot. Examine the outside of the root ball. If the roots are matted or coiled they should be teased out until they can be spread in the planting hole. If the roots are impossible to undo it is better to take a knife and make several shallow vertical cuts down the rootball. This cuts the lateral roots, forcing them to grow outward. If this is not done the roots will often never penetrate into the surrounding soil and in some cases early decline and premature death will result.
Notes Concerning Roses
The roses we produce are grown from cuttings and are on their own roots. You do not have to concern yourself about the placement of the bud union as you do in budded roses. Plant them in the same manner as any other shrub. Any suckers which appear from the base of your rose in the future will be the same variety you purchased. We recommend pruning your new rose back approximately one-third to encourage vigorous shoots. It is not necessary to prune them drastically as you do many packaged roses. In fact many prefer not to prune our roses at all when planting. Many roses are briar-like plants and will sucker and spread if given cultivated ground. As your rose ages, we recommend pruning out the oldest canes and allowing new suckers to take their place. New roses should require only the removal of winter-damaged canes in spring. Generally shrub roses are pruned more sparingly than hybrid teas or floribundas. If you want to cut back an older shrub rose do it in early spring before the buds expand. Rose hedges should also be pruned at this time. Be sure to keep the base of your hedge wider than the top to allow light to reach the bottom stems.
Althought winter protection is generally not necessary with these hardy roses, if you are trying to grow a variety that is tender in your area you can protect it in winter with either an overwintering blanket or by mounding the base with a mulch such as bark chips.
Remember that good flower production demands adequate moisture at all times, good drainage, good fertility and high light levels. If these conditions are met, and weeds kept under control, you should enjoy many beautiful blooms.
Pruning Newly Planted Fruit Trees
When you receive your fruit tree it will be either a one year tree with no or very few branches or a two year tree that is branched. One year trees generally require little in the way of pruning. You may want to prune off the terminal if it appears soft or withered, otherwise it can be left. Some people remove unwanted buds on the stem by rubbing them off sideways and leave buds only where they want branches. Generally these buds should be spaced in different directions approximately six inches apart. Two year trees should have any branches removed below 18 inches and existing branches spaced so that they are 6-8 inches apart in different directions. If the terminal is soft or damaged, prune back to a good bud, preferably facing the westerly wind, which will help straighten the new shoot. Your purpose in training young trees should be to form a balanced framework and to remove weak narrow-crotched branches or diseased wood. It is better to prune hard the first year and prune only as necessary in later years. Heavy pruning will delay fruiting, however lack of pruning may result in overcrowded branches that allow little light into the center of the tree.
How to Graft
Interested in grafting? Take a look
Below are image instructions on how to graft.

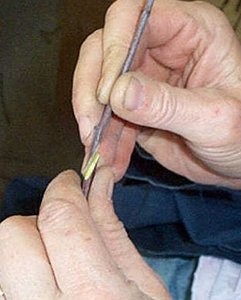
Step 1
A sharp knife and steady hands, your scion, and rootstock

Step 2
A diagonal cut is made on the rootstock and a matching cut on the scion wood

Step 3
Then a small back cut on each surface to help hold the pieces together
Step 4
If done properly the scion slides onto the rootstock and the edges match

Step 5
The joint is wrapped with parafilm, the scion cut an inch or so above the joint and dipped in a wax mixture

Step 6
The waxed grafted stock is kept cool and moist while waiting to be planted
Making Compost
The process of making compost is very simple, but attention to all the details makes the difference between a true finished compost and a pile of partly decomposed material. The essence of composting is the breakdown of organic materials into a form that is stable and in which the essential nutrients are available to plants.


It begins with an understanding of the nature of the organic materials you are using. A balance must be struck between the amount of carbon in the raw materials and the amount of nitrogen available to the bacteria that break down the carbon.
The more woody the material, the higher the percentage of carbon. Examples of high carbon materials include wood fibre such as sawdust or shredded branches and twigs. Materials with moderate carbon content include things like fall leaves, garden refuse and straw. Examples of low carbon materials include kitchen garbage, grass clippings and green leafy plants.
The low carbon materials will break down quickly with virtually no need for the addition of high nitrogen materials. The more woody the material the more nitrogen you must add to produce a quick breakdown of the materials.
There are many sources of nitrogen rich, (protein rich), material. Some of the best are fresh manure of any kind, animal wastes such as bloodmeal and fishmeal, and high protein foods used for animals such as soymeal, linseed meal, alfalfa meal and cottonseed meal. When you build your pile, mix these materials with your organic material, keeping in mind that the woodier it is the more nitrogen rich materials you need. Water enough to make the material moist but not soggy. Piles need to be at least 1 - 1.3m, (3 -4 ft), high in order to keep the heat that is produced inside the pile. Smaller piles will cool too quickly and will not produce the high heat needed to kill weed seeds and pathogens.
The sides of the pile should be exposed to the air, (oxygen). The addition of small amounts of lime into the soil can be beneficial to gardens that have acidic soils that you wish to sweeten, however do not use large quantities and realize that even without added lime compost is alklaline in nature with a pH of 8.0 or so being common for the finished compost.
Once your pile is built it needs to be turned frequently in order to introduce oxygen into the centre of the pile. As the process of decay commences you will feel the heat in the pile. A good pile reaches a temperature high enough that you should not be able to hold your hand in the pile, (160 F). If you are not feeling the heat you need to add more nitrogen. Turning frequently will keep the process aerobic, (oxygen using bacteria). Without oxygen the process turns anerobic and a strong ammonia-like smell will result.
Your pile will reduce substantially in size as the bacteria consume the carbon and release it as carbon dioxide. A good portion of your pile literally turns to air. Once the heat subsides and the texture is fine and a deep brown color with no appreciable odor, your compost is finished and can be used in your gardens.
Usually a small layer of compost worked into the surface of the garden or added to planting soil is sufficient. As a rule of thumb, do not use more then 25% by volume, as the salts in compost may be detrimental. Likewise mediums for growing seedlings and such should not contain more the 25% compost, or the salts may injure the delicate tissues.
As in the rest of life, everything in moderation.
Propagating Plants
Plants are generally propagated by seed, cuttings or grafting/budding.
SEED-If you are producing a plant from seed you must gather the seed when it is mature but before it is eaten or loosed from the plant. Most seed is produced in summer or fall. Knowing when in this time period the seed is ripe is crucial to successful gathering. Once seed is gathered it can be sown directly into a prepared section of soil or stored for later use. Because there are so many different plants it is hard to generalize about when and how to plant. Many hardy perennial plants(trees, shrubs, herbaceous perennials, etc.)need a period of cool moist conditions, called stratification, to break dormancy. For most species planting directly into the soil in fall is ideal, as this gives the seed the conditions needed to break into active growth in spring. A warning however; animals such as squirrels and mice can smell seeds and will dig them up. This is particularly true of nuts (oak acorns, walnuts, hazelnuts, etc.). A covering of 1/2in galvanized metal hardware cloth that is weighted down will help prevent predation. Seeds should be planted at a depth approximately three times the diameter of the seed. Nuts are best positioned so the tip is pointed horizontally in the hole. There are many exceptions to this rule, particularly among the perennials. Some are simply pressed into the surface so that light can trigger germination. Some seed does not require stratification and can be planted whenever convenient. Such seeds can usually be stored in a cool dry place in sealed jars. Each species will differ in the amount of time it can be safely stored. As you can see there are many differing conditions for good germination. A search online or in books that details the conditions needed for the species in question can save a lot of grief.
SOFTWOOD CUTTINGS-Many species of trees, shrubs and perennials can be propagated by taking cuttings of the new growth in mid-summer. Cuttings should be gathered when still soft but not flabby. In our area (New Brunswick) the ideal time is early July. Cuttings should be gathered in early morning when they are most turgid (filled with water). Generally a cutting is made using 3-5 leaf bearing nodes. The basal leaves are stripped and the very tip of the cutting is dipped in a rooting hormone. Note only the cut surface at the base of the cutting is dipped in the hormone. Rooting hormone above the base will only burn the tissues and will cause it to rot. Most softwood cuttings root well using a #2 rooting hormone. Some, such as rhododendrons, require a stronger #3 hormone. Once prepared, stick the cuttings to a depth of 2.5-5.0cm (1-2in) in a rooting medium of either 3parts perlite to 1part peat moss or a medium of sand with a small amount of fine peat moss incorporated. A very small amount of slow release fertilizer can be used in the mix to provide nutrients when the cutting roots. If only doing a few cuttings they can be placed in a container with a clear plastic cover supported so that the cuttings do not come in contact with the plastic. Keep the container in incidental light but not direct sunlight, which can cause overheating in the chamber. Humidify the chamber with a water bottle spritzer just enough so it does not dry. Too much water is just as bad as too little. Balance is the key. Larger amounts of cuttings can be rooted in a low coldframe placed on the north side of a building or in a similar light situation. These can be made using boards for sides and old windows hinged at the back so the cuttings can be checked and later opened slightly to allow for the conversion to lower humidity levels. In such a chamber sand makes an ideal medium. Generally cuttings will root in 2-3 weeks. Resist the temptation of constantly checking them by pulling them out and re-sticking. You will know they have rooted when growth commences from the buds. After growth begins, leave the cuttings for a week or more to allow the roots to grow to a size that will support the plant when transplanted. Remember that the cuttings are used to high humidity and low light levels. You must gradually condition them to drier conditions and higher light levels. The process is simple but every detail is critical for success.
HARDWOOD CUTTINGS-Some species such as willow, poplar and currant can be stuck directly into the soil. Use wood from the last year’s growth cut into sections around 15cm (6in) long. These are plunged into the soil so that only the top bud shows. This prevents the cutting from drying before rooting occurs. Ideally, leave rooted cuttings for the rest of the season and harvest in early spring to plant into their final location. Conifers such as cedar, juniper, microbiota, false cypress and others are often rooted in the winter. The trick here is to keep the top of the cuttings cool and the rooting medium warm (21c/70f). The cuttings are prepared using the last year’s wood, or sometimes a bit of two year wood at the base. The bases are stripped and the tip dipped in rooting hormone (most often #3). Usually a plastic tent is placed over the cuttings and enough water used to keep the chamber humid. Avoid overwatering. Rooting can take up to two months.
GRAFTING AND BUDDING-Fruit trees and several ornamental species are propagated by placing a section of the last year’s wood (a scion) onto a rootstock. By using this method plants that have unique characteristics (cultivars) can be maintained. Often these plants are difficult to root. Some, such as weeping trees, are grafted at a height that allows for easier nurturing or to provide an enhanced form. Grafting usually takes place in early spring. Budding can be accomplished in summer (usually August in our area) or spring if using a chip bud. The secrets to success are to match the cambium layers (thin green layer below the bark) of both rootstock and scion and to protect the graft from drying out before the union is complete. Images of one of the more popular techniques are presented in the grafting section of Our Tips.
Pruning Fruit Trees
Pruning fruit trees can be daunting for some, but it doesn’t have to be.
Pruning Guide
The art and science of pruning fruit trees has evolved over the last century and many practices that were considered 'proper' even a decade ago are now being called into question. The following guide is based on the newest research. The essence of the technique is to prune only what is required to create a balanced framework. Particularly with dwarf trees, the leader of the tree is not cut, with the possible exception of pruning back one year whips to encourage initial branching.
Dwarf trees begin bearing early and growers have found it is better to leave the leader and let the tree 'fruit itself out', meaning that once it begins fruiting, a tree's energy is concentrated into seed production and production of new growth slows, keeping the size of the tree in control. Hard pruning a young tree will tend to delay fruiting.
First Year
You can purchase either 1 year or 2 year trees. If you purchase a 1 year tree it is generally a single 'whip' with no branches, or possibly 1 or 2 small side branches. Most growers cut back a whip to approximately 125 cm (4ft) to encourage side branching to develop. Cutting to a west facing bud is generally a good idea, as the prevailing winds will encourage it to grow straighter.
If there are low branches remove them, as snow load will often strip them from the main stem. If you have purchased a 2yr branched tree, and the branches are closer than 20cm (8in) apart, you may want to reduce the branches so that there is more space between them, because branches do not move upward but only grow larger. Spacing the branches will prevent crowding later in the tree's life.
Second Year
Remove only branches that cross other branches and remove main lateral branches that are too crowded. Some growers do head back (cut the tips) of side branches to encourage more side branching where fruit spurs will eventually form.
Sucessive Years
The purpose of pruning is to give each branch an equal amount of sunlight. Prune the tree enough to open it up to sun without creating large amounts of empty and unproductive space. Each tree is unique and where and how much you prune should be guided by the general principle stated above.
By keeping the terminal intact, you will create a balanced tree that will stand up to wind, snow and fruiting loads. As the trees age, and if they get too large for the space, the terminal can be cut to a weaker side branch. Doing this annually will keep the size of the tree down, however this should not be done till after fruiting has begun.
Thinning Fruit
Removing a portion of the developing young fruit when they first begin to swell will decrease the weight on each branch and will usually increase the size of remaining fruit. It can also help to balance the yearly yield so that the next year's crop will not be too small. A heavy crop in one year often results in a light crop the following year.